需要的文档资料 微软官方WSL文档
ArchWSL官方Github
ArchWiki
访问微软官方WSL文档 ,按照提示,打开PowerShell,执行
1 2 dism.exe /online /enable-feature /featurename:VirtualMachinePlatform /all /norestart dism.exe /online /enable-feature /featurename:VirtualMachinePlatform /all /norestart
前往wsl2kernel下载页 ,按提示下载安装 MSI文件。
重启。
1 wsl --set -default -version 2
访问ArchWSL官方Github ,下载Zip包,解压到磁盘空间较大的地方。运行Arch.exe完成安装。
运行wsl --list --verbose以查看当前已安装的WSL信息及所属WSL版本。
1 2 3 PS C:\WINDOWS\system32> wsl --list --verbose NAME STATE VERSION * Arch Stopped 2
进入linux系统。
先换源,
1 nano /etc/pacman.d/mirrorlist
找到China,把地址前的注释标记#删除。
在更新系统/装软件之前,先解决密钥问题。
参照wiki页面pacman-key#Resetting all the keys ,
1 2 3 rm /etc/pacman.d/gnupg -rf pacman-key --init pacman-key --populate archlinux
然后更新密钥库,
1 pacman -Sy archlinux-keyring && pacman -Su
然后就可以更新系统了,
接下来设置用户。
给root设置密码,
创建用户yy并设置密码,
1 2 useradd -m -G users -s /bin/bash yy passwd yy
用visudo配置sudo,先安装vi,
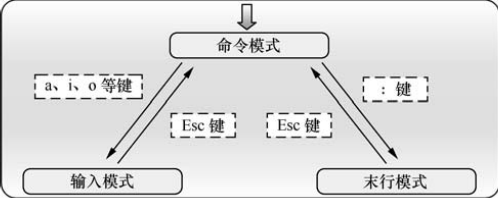
参考《LinuxProbe》PDF第93页,找到root ALL=(ALL) ALL下面一行,敲i键,输入yy ALL=(ALL) ALL,ESC,:w,回车,:q,回车。
为了避免每次用sudo都要输密码的麻烦,可以使用yy ALL=NOPASSWD: ALL
切换至yy。
接下来安装yay,由于makepkg需要在普通用户下操作,上述操作不可跳过。
参考yay-github ,
1 2 3 4 sudo pacman -S git git clone https://aur.archlinux.org/yay.git cd yaymakepkg -si
运行makepkg时报错,提示==> ERROR: Cannot find the strip binary required for object file stripping.
参考了下面两篇博文
makepkg遇到问题ERROR: Cannot find the strip binary required for object file stripping.
ArchLinux 或 Manjaro WSL2 配置记录
1 sudo pacman -S base-devel
出现:: fakeroot is in IgnorePkg/IgnoreGroup. Install anyway? [Y/n],一直选 y,然后一直回车即可。
重新运行makepkg,刚才的错误没了,提示==> ERROR: Failure while downloading https://github.com/Jguer/yay/archive/v10.0.3.tar.gz Aborting...
下面开始设置代理网络
参考了WSL2网络代理配置(apt与git) 和wsl2 怎么设置才能走 clash 的代理? ,打开酸酸乳,设置端口号为10808,勾上允许LAN连接。
1 2 export https_proxy="socks5://127.0.0.1:10808" curl myip.ipip.net -v
得到:
1 2 3 4 5 6 7 8 9 10 11 12 13 14 15 16 17 18 19 * Trying 116.211.155.164:80... * Connected to myip.ipip.net (116.211.155.164) port 80 (#0) > GET / HTTP/1.1 > Host: myip.ipip.net > User-Agent: curl/7.71.1 > Accept: */* > * Mark bundle as not supporting multiuse < HTTP/1.1 200 OK < Date: Mon, 03 Aug 2020 10:31:14 GMT < Content-Type: text/plain; charset=utf-8 < Content-Length: 66 < Connection: keep-alive < X-Via-JSL: 1cf16e4,- < Set-Cookie: __jsluid_h=c788899fbb19eebb70bea6ef91909824; max-age=31536000; path=/; HttpOnly < X-Cache: bypass < 当前 IP:36.24.12.82 来自于:中国 浙江 杭州 电信 * Connection #0 to host myip.ipip.net left intact
失败了。最后参照Proxy_server-ArchWiki 用proxychains的解决方案:
先获取本机wsl虚拟网卡的ip地址,
找到WSL:
1 2 3 4 5 6 7 以太网适配器 vEthernet (WSL): 连接特定的 DNS 后缀 . . . . . . . : 本地链接 IPv6 地址. . . . . . . . : fe80::5195:2b19:fcc3:e8cc%61 IPv4 地址 . . . . . . . . . . . . : 172.26.112.1 子网掩码 . . . . . . . . . . . . : 255.255.240.0 默认网关. . . . . . . . . . . . . :
回到bash,安装并配置proxychains,
1 2 pacman -S proxychains sudo nano /etc/proxychains.conf
在最后一行输入
1 socks5 172.26.112.1 10808
保存退出。
1 proxychains curl myip.ipip.net
结果:
1 2 3 4 5 [proxychains] config file found: /etc/proxychains.conf [proxychains] preloading /usr/lib/libproxychains4.so [proxychains] DLL init: proxychains-ng 4.14 [proxychains] Strict chain ... 172.26.112.1:10808 ... myip.ipip.net:80 ... OK 当前 IP:52.185.164.21 来自于:日本 东京都 东京 microsoft.com
done!
然后,
1 2 cd ~/yayproxychains makepkg -si
成功安装yay。
下面开始折腾图形用户界面。经过5+小时的折腾,百度参考了大量网页Blog,踩了无数坑后,终于使Xfce桌面成功显示。以下是正确配置过程。
先在Windows安装VcXsrv,访问其官方SourceForge页面 以下载。
安装并运行,第一页的Display Number改成0,第三页勾上Disable access control,完成。
(经测,Display Number不改没关系,Disable access control必需勾上)
回到linux,执行
1 2 3 pacman -S xorg xfce4 xfce4-goodies dbus export DISPLAY=$(awk '/nameserver / {print $2; exit}' /etc/resolv.conf 2>/dev/null):0startxfce4
(如果是X410,需要在其托盘图标上点击右键,勾上Allow Public Access)
将上面的export命令写入~/.bashrc就不用每次启动都执行,
粘贴export DISPLAY=$(awk '/nameserver / {print $2; exit}' /etc/resolv.conf 2>/dev/null):0,保存退出。
1 2 source ~/.bashrcecho $DISPLAY
后来发现不太需要Xfce桌面,只需要运行需要的软件。于是
1 pacman -Rs xfce4 xfce4-goodies
卸载后TeXmacs依然能正常运行。
参考:
WSL2的图形输出配置
wsl2图形界面的安装,wsl同理
Tips:有问题可参考这篇Blog 在Windows下安装Arch Linux子系统
8.5更新
解决GitHub的raw.githubusercontent.com无法连接问题 ,编辑hosts。
解决mysql数据库服务无法启动问题,参考WSL2(Arch Linux)使用systemd ,安装genie:
1 2 3 yay -S genie-systemd genie -s systemctl start xxxxx
更新:参考https://www.cnblogs.com/zsmumu/p/12416159.html
解决yay代理无法通过proxychains问题:
1 2 sudo pacman -S gcc-go yay -S yay